1. Name: Melanie Harris
2. Where are you from: South Coast of NSW, Australia.
3. Tell us about you.....
I am a 31 year old scrap addict from Australia. I live on the South Coast of NSW with my husband Peter and 2 children, Lillee and Alex.
Although I have had 3 years of scrapping Lillee and prettying up the pages with ribbons, flowers and bling Im really looking forward to now challenging myself with masculine pages.
4. Tell us about your babies.....
I have been blessed with 2 children, my daughter Lillee will be 4 in September and our little man Alex is 3 months old.
5. your favorite scrappy supply
I love paper, paper and more paper.
My favourite manufacturers are Webster’s Pages, Basic Grey and Pink Paislee.
6. Your favorite must have baby item
A sling, having two free hands is so much easier than the juggling act.
My little man also loves to sleep in his pram through the day so I can wheel him through the house.
7. your blog address
http://throughourchildseyes.blogspot.com/
A few fabulous layouts by Melanie
Be sure to visit our August/Sept sponsor Tres Chic Unique
Sunday, July 25, 2010
Friday, July 23, 2010
7/23 Jen's Making Stencils From a Photograph tutorial
Making Stencils From a Photograph
I love to create personalized pages or altered items from images that mean something to me. So, I found a way to create a silhouette of my kids in order to use on a page, journal, frame, or any where I want! I start with a photograph of either the entire body or just the portrait. Side views work best but even a photo of an object, as long as you can tell what it is without any inside details, will work.
Here I chose a few photos of my youngest son, Christopher. I am using a regular copier transparency (you can find these at any office supply store).
1. Place the transparency on top of the photo that you want to use. Print the photo on a piece of copy paper first or use one that you already have printed. You will want a Sharpie marker or permanent marker for the next step.
2. Use a permanent marker to trace around the image. Cut out the traced transparency carefully with an Exacto blade. Make sure you cut neatly as you will be using both the positive and negative spaces.
You can see here what I mean about cutting so you can use both.
3. Now you are ready to spray. Lay the transparency (with the image cut out) onto a piece of paper. I chose a piece of music paper. Use Glimmer mist or spray paint to spray. Lift the transparency off and clean off. Let dry. I also used the positive image (or cut out part) to spray onto a page with three different colors. You will see that it created a different look to the negative space one.
4. Next I used a stamp to create a design inside the empty space of one of my images. I placed the negative space transparency over the sprayed image lining it up (you could place removable adhesive on the back to hold in place). I used a text stamp and stamped the space to create a filled in version of the image. Lift the transparency off and VOILA!
5. I did the same to the next space with individual letter stamps to create an artistic alphabet background.
6. Here's what it looks like so far...
7. Next, back to the music paper. I cut out the image and pop dotted it onto the last space on my page so it sticks up slightly. I wrote my journaling over it and added a title and heart sticker for emphasis.
Here's the finished journal page:
I hope you enjoyed this little tutorial on how to make your own personalized masks/ stencils from photographs.
Tuesday, July 20, 2010
Design Team additions!
The design team call is now over. I want to thank all of you who applied to Scrap that Baby. We had SOOOO many completely fantastic entries featuring so many adorable babies... I was very much overwhelmed by how many applications I received for an uncompensated design team. It was such a hard decision. I chose based on unique style, layout photography, relevance to our theme, design and the ability to tell the story..
In the end I decided to add 6 more ladies instead of 4...... and HERE THEY ARE
Please welcome these fabulous additions to our design team
Tracey Campbell
Michelle Fowler
Heather Gerritis
Melanie Harris
Kelly Haugen
Jess Mutty
Bios will be posted over the next couple days!
While you're checking them out make sure to check out the latest prompt All around the Nursery for a chance to win the pretty pebbles kit from Scrappy Jo's
In the end I decided to add 6 more ladies instead of 4...... and HERE THEY ARE
Please welcome these fabulous additions to our design team
Tracey Campbell
Michelle Fowler
Heather Gerritis
Melanie Harris
Kelly Haugen
Jess Mutty
Bios will be posted over the next couple days!
While you're checking them out make sure to check out the latest prompt All around the Nursery for a chance to win the pretty pebbles kit from Scrappy Jo's
Monday, July 19, 2010
Renee's ribbon flower tutorial
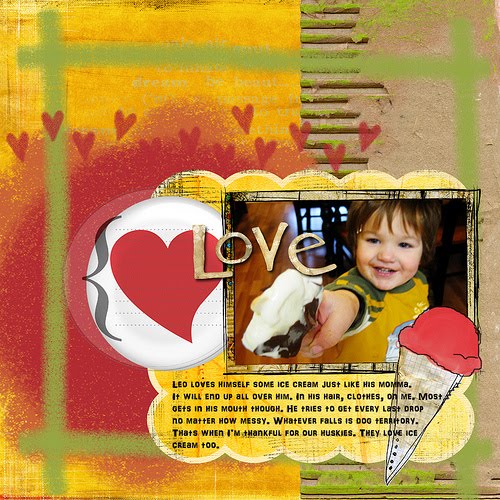
I got this really great ribbon from American Crafts. It has a scalloped edge to it, and I thought, "That would make a cute flower." So I created my own ribbon flower that I used in the layout below
Here's what you will need:
1. Embroidery Floss (around 6 inches or so depending on the size of your ribbon)
2. Ribbon/Lace (around 6 inches)
3. Needle with a smaller eye
Here's what you do:
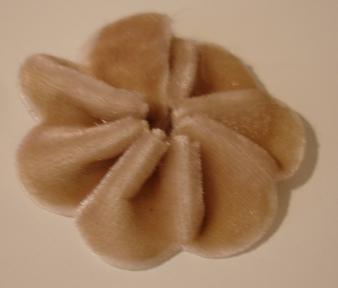
1. Begin by threading the needle and knotting the end then weave it through the edge of the ribbon.
2. Cinch the ribbon tightly by pulling the ribbon toward the knotted end of the embroidery floss.
5. Trim the excess ribbon and tie your floss in a knot getting the knot closest to your beginning knot. I try to make both knots to look like one like in the photo below.
6. Cut of the extra floss
You can embellish these with brads and layer with other flowers.
In my layout I layered with tulle and used a brad
Here's what you will need:
1. Embroidery Floss (around 6 inches or so depending on the size of your ribbon)
2. Ribbon/Lace (around 6 inches)
3. Needle with a smaller eye
Here's what you do:
1. Begin by threading the needle and knotting the end then weave it through the edge of the ribbon.
2. Cinch the ribbon tightly by pulling the ribbon toward the knotted end of the embroidery floss.
3. Keep weaving until you have created the desired fullness and look
4. End with your needle coming out the top of the ribbon then poke through top of where you started so your needle ends underneath the flower.
5. Trim the excess ribbon and tie your floss in a knot getting the knot closest to your beginning knot. I try to make both knots to look like one like in the photo below.
6. Cut of the extra floss
You can embellish these with brads and layer with other flowers.
In my layout I layered with tulle and used a brad
Thursday, July 15, 2010
Prompt 9: All around the nursery
When I was pregnant I was filled with so much excitement of just thinking of what to do with the baby's room. Unfortunately we moved when I was about to pop so I didnt get to paint and decorate the way I had hoped. I did make sure to pick out a darling little comforter set and a beautiful crib to make her room special.
This prompt is all about the baby's room. Did you make a special project to decorate little one's bedroom? Do you love the paint color or the little quilt for her little bed? Does your little one have a magical area in their room they like to play? Did you get a racecar for his first big boy bed? Does the room fit the little princess that she is? Show us what is special about where your little one sleeps.
We have an awesome sponsor and an AWESOME prize pack for this challenge! Check out....
Here is the awesome prize you can win....
Check out what the design team did?
This prompt is all about the baby's room. Did you make a special project to decorate little one's bedroom? Do you love the paint color or the little quilt for her little bed? Does your little one have a magical area in their room they like to play? Did you get a racecar for his first big boy bed? Does the room fit the little princess that she is? Show us what is special about where your little one sleeps.
We have an awesome sponsor and an AWESOME prize pack for this challenge! Check out....
Are you looking for quality, name brand scrapbooking products at reasonable prices? Scrappy Jo’s Scrapbook Supplies offers what you are looking for and more. Our online store lets you shop 24/7 in the comfort of your own home with an easy & quick check out process. We also provide great customer service, our money saving Scrappy Shipping rates & gift certificates. Most products are in-stock, on sale & ready to ship. Don't see a product you desire, then email us and we will try to locate your item. First time SJ shoppers can take advantage of additional savings today by using code FIRSTTIME15 during your order check out. So stop by, look around & save.
Here is the awesome prize you can win....
Check out what the design team did?
By Jennifer Mattot
**I made this for my son's nursery using Prima papers, wooden banner triangles and stars and Jenni Bowlin suns. The yellow stars are wall clips to hold a quilt but I used them to hold this up. The saying on the wall is a vinyl wall decal. This hangs behind his crib.
By Ann-Katrin Toresen
By Gracie Ann David-Tan
**Made these small flower frames for my new niece's nursery. I used cardboard, tissue paper, glue mixed with a little water and paint to create the paper mache frames. The letters are American Craft Thickers.
By Renee Kelso
By Sara Robinson
**Sara created this project using a tutorial found on Heahter Bailey's blog. Heather adapted the tutorial from the American Crafts blog
By Jenny Dziekan
By Dani Smith
**I made Jonah some candles (well, actually I didn't MAKE the candle.. but I personalized them) to go in his room. We don't light them or anything, but just them being in there makes his room smell a lot better. =)
By Danielle Holsapple
Layouts/Projects are due July 30th. Our 10 fabulous favorites will be posted July 31st. One lucky winner will win the Pebbles prize pack from Scrappy Jo's
Add your layout to the Mr Linky below or leave us a comment to enter. We cant wait to see what your baby's room!!
Wednesday, July 14, 2010
Foodie favorites
Mmmmm Im hungry!
So many adorable foodie layouts came in for this prompt! Truly a feast for the eyes
Here are our foodie favorites:
One of these lucky ladies will win the cute ribbon kit from funkytown etsy shop!! Check back next week for the winner! The new prompt will go up tomorrow afternoon.
Also there are just a few more days left in our design team call! Get your entry in!
So many adorable foodie layouts came in for this prompt! Truly a feast for the eyes
Here are our foodie favorites:
By Amy Chretin
By Izzy
By Heather Gerrits
By Jennifer Croasdale
By LG Belarmino
By Rebecca Kvenvolden
One of these lucky ladies will win the cute ribbon kit from funkytown etsy shop!! Check back next week for the winner! The new prompt will go up tomorrow afternoon.
Also there are just a few more days left in our design team call! Get your entry in!
Tuesday, July 6, 2010
Design Team Call!
I know its only been 4 months but Scrap that Baby! is looking to add at least 4 more girls to our fabulous design team! If you love to scrap kids 4 and under we are looking for you!
To apply email scrapthatbaby@hotmail.com the answers to the following questions and attach 3 of your favorite baby layouts (that best showcase your current style)
1. Tell us about the babies you scrap. (ages newborn thru 4) How old are they? Are you Mommy? Grandma? Nana? Auntie Sarah? Babysitter? Are you scrapping pictures of your grown(or semi-grown) children from way back when?
2. Are you (or have you been) on any other design teams?
3. What message boards to you frequent?
4. Do you alter projects or make cards?
5. Link your blog (if you have one)
6. Link to an online gallery where we can see the scope of your work
1. One NEW never seen layout per month (You are required to create a NEW layout for 1 of the 2 challenges monthly. You may submit a previously seen layout for the other challenge or opt out.)
2. Leave love/comments on participant's blogs and help choose the favorites
3. Write at least 1 tutorial, tip, article or technique during your term.
4. Promote Scrap that Baby! on message boards you frequent and your personal blog (if you have one)
5. Commit for a 6 month term.
To apply email scrapthatbaby@hotmail.com the answers to the following questions and attach 3 of your favorite baby layouts (that best showcase your current style)
1. Tell us about the babies you scrap. (ages newborn thru 4) How old are they? Are you Mommy? Grandma? Nana? Auntie Sarah? Babysitter? Are you scrapping pictures of your grown(or semi-grown) children from way back when?
2. Are you (or have you been) on any other design teams?
3. What message boards to you frequent?
4. Do you alter projects or make cards?
5. Link your blog (if you have one)
6. Link to an online gallery where we can see the scope of your work
Requirements:
1. One NEW never seen layout per month (You are required to create a NEW layout for 1 of the 2 challenges monthly. You may submit a previously seen layout for the other challenge or opt out.)
2. Leave love/comments on participant's blogs and help choose the favorites
3. Write at least 1 tutorial, tip, article or technique during your term.
4. Promote Scrap that Baby! on message boards you frequent and your personal blog (if you have one)
5. Commit for a 6 month term.
***APPLICATIONS are due Sunday June 18th at 11:59pm EST ***
Winner winner winner!!
the votes are in and the winner is......
JUS!!
We all loved your darling layout and your clever title. Email your name and address to scrapthatbaby@hotmail.com
so we can get you the adorable American Crafts baby kit from Scrappy Jo's!!
Thursday, July 1, 2010
Prompt 8: Good Eats
Is your child wild for watermelon?
Does she swoon for spaghetti?
Is breast best or are you a fan of formula?
This prompt is all about feeding your baby! Whether its first foods, favorite foods, a typical daily menu or why you choose to feed what or when one thing is for sure... baby's gotta EAT!
We have an awesome ribbon kit waiting for the winner of this challenge from Funkytown Etsy shop. We will tell you all about funkytown soon!
Check out this fabulous layout by guest designer Theresa Kobach....
Now check out what the design team did:
Add your layout to the Mr Linky below or leave us a comment to enter you layout, mini or project featuring a child under 4 enjoying something delicious
Does she swoon for spaghetti?
Is breast best or are you a fan of formula?
This prompt is all about feeding your baby! Whether its first foods, favorite foods, a typical daily menu or why you choose to feed what or when one thing is for sure... baby's gotta EAT!
We have an awesome ribbon kit waiting for the winner of this challenge from Funkytown Etsy shop. We will tell you all about funkytown soon!
Check out this fabulous layout by guest designer Theresa Kobach....
Now check out what the design team did:
By Gracie Ann David-Tan
By Brandi Pitts
By Sarah Rice
By Renee Kelso
Layouts are due by July 13th. We will post our 10 fabulous favorites on July 14th. One of those lucky ladies will win an awesome ribbon kit from the funkytown etsy store.
Add your layout to the Mr Linky below or leave us a comment to enter you layout, mini or project featuring a child under 4 enjoying something delicious
July 1st Guest designer bio
m sure you have seen this fabulous scrapper around. She has a killer funky style and adorable daughters! Be sure to check out the super talented.......
Hi, my name is Theresa. I am a mom to three girls, Reese , Cameron and a boxer pup named Topanga. Aside from my favorite hobbies, scrapbooking and taking pictures , I have also found a new love for art journaling. It is so expressive and very therapeutic. I like to shop, for anything really. I tend to buy things in mass quantities or on clearance.
I would like to thank Sarah for the opportunity to be a guest designer! ♥
Check out her blog HERE
Theresa Kobach
Hi, my name is Theresa. I am a mom to three girls, Reese , Cameron and a boxer pup named Topanga. Aside from my favorite hobbies, scrapbooking and taking pictures , I have also found a new love for art journaling. It is so expressive and very therapeutic. I like to shop, for anything really. I tend to buy things in mass quantities or on clearance.
I would like to thank Sarah for the opportunity to be a guest designer! ♥
Check out her blog HERE
Subscribe to:
Posts (Atom)