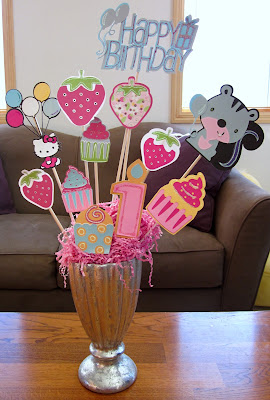
For my daughter’s 1st birthday, I wanted to go with the theme “Cupcakes & Strawberries”. Since she has a June birthday I thought this would be a perfect theme. I had a very difficult time finding decorations to go with this theme so I decided to make my own. I came up with personalized bouquet for the table.
I started with cardstock, patterned paper, adhesive, stickles, wooden dowels, my cricut, a vase (that I had just sitting around), packing tape, green floral filler & shredded decorative paper or raffia.
I cut out the designs and figures I wanted to use. In this case it included cupcakes, strawberries and birthday themed items along with one “Angry Gopher” for the face my daughter would make for absolutely any reason she could findJ I knew I would have this arrangement against a wall so I didn’t care what the back looked like. If I was going to use this vase in the open then I would duplicate the base cut and seal the dowel in between the front base and the back cover base so you and your guests wouldn’t be able to see the packing tape holding the design to the dowel.
After I’ve assembled my figures/designs, I add accents with stickles, white pen and black marker. The stickles needs to dry before moving on or it will smudge.
Once everything is dry, I use packing tape to adhere the wooden dowels to the designs/cut-outs. Then place the green filler foam in the bottom of your vase and insert/arrange the dowels in the fashion you want them to be displayed. Take the shredded paper and cover the green filler so it can’t be seen. Pack it around and inside the vase so it will stay put.
Ta Da! A custom made bouquet for your little prince or princess’s birthday (or whatever occasion! I’ve made these for 40th and 50th birthdays too.)


1 comment:
Wow Kelly, that is adorable.
Post a Comment