Click to check out our current challenge Wacky Words

Be sure to visit our August/Sept sponsor Tres Chic Unique

Friday, December 24, 2010

12/23 Kelly's custom bouquet tutorial

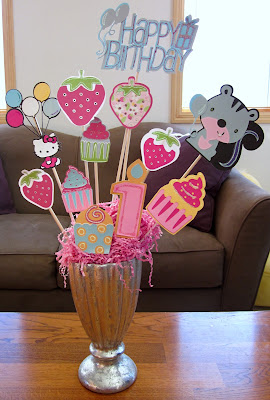
For my daughter’s 1st birthday, I wanted to go with the theme “Cupcakes & Strawberries”. Since she has a June birthday I thought this would be a perfect theme. I had a very difficult time finding decorations to go with this theme so I decided to make my own. I came up with personalized bouquet for the table.


I started with cardstock, patterned paper, adhesive, stickles, wooden dowels, my cricut, a vase (that I had just sitting around), packing tape, green floral filler & shredded decorative paper or raffia.


I cut out the designs and figures I wanted to use. In this case it included cupcakes, strawberries and birthday themed items along with one “Angry Gopher” for the face my daughter would make for absolutely any reason she could findJ I knew I would have this arrangement against a wall so I didn’t care what the back looked like. If I was going to use this vase in the open then I would duplicate the base cut and seal the dowel in between the front base and the back cover base so you and your guests wouldn’t be able to see the packing tape holding the design to the dowel.
 
 
After I’ve assembled my figures/designs, I add accents with stickles, white pen and black marker. The stickles needs to dry before moving on or it will smudge.


Once everything is dry, I use packing tape to adhere the wooden dowels to the designs/cut-outs. Then place the green filler foam in the bottom of your vase and insert/arrange the dowels in the fashion you want them to be displayed. Take the shredded paper and cover the green filler so it can’t be seen. Pack it around and inside the vase so it will stay put.
Ta Da! A custom made bouquet for your little prince or princess’s birthday (or whatever occasion! I’ve made these for 40th and 50th birthdays too.)

Wednesday, December 15, 2010

Prompt 19 Sleep Baby Sleep

Sleep, baby, sleep,
Thy papa guards the sheep;
Thy mama shakes the dreamland tree
And from it fall sweet dreams for thee,
Sleep, baby, sleep.

Nothing can be more calming than watching a baby sleep. Something about watching her little eyes close and flutter into dreamland just makes my heart melt.

For prompt 19 your challenge is to scrap a photo of your sweet little child 4 or under sleeping.

We have a wonderful sponsor this month. Check out Catch The Moments Kits:


Catch the Moments Kits is a fabulous, unique kit company! You won't find anything else like us! No membership, no monthly commitments, just buy what you want, when you want! CTM kits are made of the latest and greatest products at the best prices! All kits are $18 and add-ons are $7! CTM also sells the newest products at prices much below MSRP! We are also your home for THICKERS! We carry the newest thickers at the lowest prices you will find ANYWHERE! Check out our photostream on our blog and order right from there! You can always email Devon with questions or special orders! Check it out and become a follower! There is going to be a huge sale when we hit 150 followers! And always remember to Catch the Moments!
 
*** pssst... there is a BIG SALE at Catch the Moments right now*****

One lucky winner from either prompt 18 or prompt 19 in december will win this Joyful kit from CTM!


Check out these fabulous layouts from the design team

Michelle Fowler

Sara Robison

Kelly Haugen

Gracie Ann David Tan

Sarah Rice

Brandi Pitts

Heather Gerrits

Maya Oren-Dahan

Sarah Rice

Jenny Dziekan

Kelly Haugen

Brandi Pitts

Sarah Rice

We cant wait to see your sleeping babies!! Layouts/projects are due by December 30th. We will post our fabulous favorites on December 31st... and one of those lucky entries (along with prompt 18) will win the awesome Jolly kit from Catch The Moments Kits! If you entered prompt 18 you can play again for another shot at winning as our design team will be voting for their favorite layout from both prompts! Just add your link to the comments or the Mr Linky below to enter!!


Prompt 18 favorites

Its the busy time of the year... so we only have 2 favorites for this prompt.... but they are a-mazing!!


Both of you ladies (along with the favorites from Prompt 19) are in the running for that fabulous catch the moments kit!! Check back after the new year for December's winner

Monday, December 13, 2010

November winner!!

The votes have been counted and boy oh boy was it close! The winner for November's prize, a super fun kit from Tidbitz in Time is.....

Not Just for kids by Tarynne Wise


Tarynne please email your address to me at scrapthatbaby@hotmail.com and Wendy will send your kit too you!! Congrats on a super cute layout! :)

Thursday, December 9, 2010

12/08 Jess's rolled flower tutorial

Today I'm going to show you how to create rolled flower embellishments two different ways.  I love these flowers because they're super easy, you can make them to match your project, and they are about as inexpensive as it gets! 
You'll need a length of crepe paper, scraps of cardstock, brads, and adhesive for the first flower.  I often use white crepe paper because it matches everything and is ink-able and mist-able if you want to color it.  And it's less than $1 a roll! 

- Fold the crepe paper in half width-wise.  Don't worry too much about the length, as it will vary depending on the size flower you want.  Err on the side of too long, rather than too short.
- Tie a loose knot in one end.

- We're going to create the petals by folding the paper over at a 90 degree angle.  Continue folding the paper this way, always in the same direction, as show in the photo... but fold it starting close up to the knot.  I just wanted you to see how the folds look. 


- Continue to fold and wrap in a circular pattern around the knot, loosely holding it with your fingers.  Take care to not smash the petals as you go!


- Here is what the underside looks like:


- When you've folded enough to get the size you want trim the paper and tuck the end under.  It should look like this:


- Punch a hole in the center of a scrap piece of cardstock.  Use a paper piercer or other sharp tool to poke a hole through the center of the flower.  Push a brad through the flower and backing and set the ends. 


- For this flower I first sprayed the crepe paper with pink mist and let it dry.  Pretty!


- The next flower requires the same items as the first, but without a hole in the center of the circle backing.  Instead, cover the entire circle (the size you want your finished flower) with adhesive. 
- Tie one end of the crepe paper in a knot and twist the rest of the paper into a thin rope.


- Stick the knot on the center of your adhesive covered circle and begin to wrap the rope of paper around the knot. 
- Continue until you reach the end of the circle backing, trim and tuck the end to the back.
- Add a brad if you want one.
These flowers also look amazing when they're made from strips of fabric or ribbons!  When I use fabric scraps, like I did for this last flower, I love to use a selvedge edge or tear the strip so there are loose threads showing, giving it a distressed feel. 

Now you have a little garden of homemade blooms to add to your scrapbook pages, gifts, cards, or other crafty projects!

Thursday, December 2, 2010

Prompt 18: OUCH!

Bumps and bruises happen... especially if you have a toddler.

So do shots :(

and sometimes even babies get sick


This prompt is all about the OUCH! Scrap something that hurt. A gigantic bruise from that first big wipeout, the time you were up all night with a sick baby, those teeth cutting or a broken bone . I know these dont seem like the most pleasant memories but they are things you will want to remember.

We have a wonderful sponsor this month. Check out Catch The Moments Kits:


Catch the Moments Kits is a fabulous, unique kit company! You won't find anything else like us! No membership, no monthly commitments, just buy what you want, when you want! CTM kits are made of the latest and greatest products at the best prices! All kits are $18 and add-ons are $7! CTM also sells the newest products at prices much below MSRP! We are also your home for THICKERS! We carry the newest thickers at the lowest prices you will find ANYWHERE! Check out our photostream on our blog and order right from there! You can always email Devon with questions or special orders! Check it out and become a follower! There is going to be a huge sale when we hit 150 followers! And always remember to Catch the Moments!
One lucky winner from either prompt 18 or prompt 19 in december will win this Joyful kit from CTM!


Check out theses fabulous OUCH layouts from the design team:

Melanie Harris

Jess Mutty

Heather Gerrits


Maya Oren-Dahan

Now show us your OUCH!! Layouts/projects are due December 13th. On December 14th we will post our fabulous favorites and one of those lucky gals (along with the favorites for prompt 19) will have a chance to win the Joyful kit from Catch the Moments kits. ! Just add your link to the comments or the Mr Linky below to enter!!
(p.s. Catch the Moments is having a blog promotion with a nice RAK at the moments. Stop by and follow the blog and check out the design team for a chance on winning it!)